Retouching a face in Photoshop is an obligatory step, an important step towards a beautiful and aesthetically pleasing photo. Not all images need additional processing, but often it is simply impossible to do without it. Professional and amateur photographers know how to get the perfect shot. Adobe Photoshop is exactly the tool without which it is difficult to enjoy the captured moment.
What is retouching?
Retouching is about enhancing pictures with photo editor tools. In the program "Photoshop" processing of the skin is done with the tool "Stamp", "Healing Brush" or "Patch". "Stamp" puts one part of the image on top of another. Knowledge of basic, simple retouching is necessary if it is related to the main activity, such as photography. Editing eliminates minor skin imperfections, image imperfections that arose during the shooting. Face retouching automatically helps the photographer save time and effort in post-processing. Often the end result needs manual correction. Beginners can use one of the skin cleansing methods called "Color Contrast". It removes pimples, makes the texture clean and even.
Sequencing
- Invert the copy of the photo with Ctrl + I, select the Blending Mode "Linear Light".
- Go to the "Image" - "Adjustments" - "Brightness / Contrast" tab. Check the "Use old" checkbox, contrast value -50.
- Click the "Filter" - "Other" - "Color Contrast" tab. The blur radius should be approximately 20 pixels.
- Next, "Filter" - "Gaussian Blur". Increase the blur radius to 3.9.
- Add a black mask to the photo, activate a brush with soft edges, color - white, opacity 30-40%. Activating the layer mask, brush over the face and neck without touching the eyes and lips.
Photoshop program
Today everyone knows what a photo editor is. Retouching the face, creating collages, drawings, vectors - all this and not only can the program "Photoshop". Adobe Photoshop CS6 is the reference version of the famous graphics editor, which has intriguing features. Content Aware makes photo processing smart and comfortable. A beautiful and user-friendly interface with the ability to process video is a huge plus of this version. There are file navigators Bridge and Mini Bridge here. They allow you to sort and manage images. The presence of "hot" keys, an intuitive interface, flexible settings and realistic effects makes the program ideal.

Benefits
Who hasn't dreamed of mastering a photo editor? Facial retouching enhances the picture, if it is correct, it gives dynamism. The Photoshop program has a lot of advantages, regardless of the version. With its help, it is easy to edit single pictures, do batch processing, create complex collages, drawings. A graphics tablet improves the quality of images, simplifies the work of the designer, photo artist and retoucher. The program provides a large space for creativity and work.
How to master?
Many face retouching software (such as Portrait Professional) are fairly easy to use. With their help, it is easy to make light retouching, which does not require energy costs from the user. Often, such programs process photographs in automatic mode, which saves time, but negatively affects the result. The Photoshop program, including early versions, is quite difficult to learn, as it is focused on professionals and performing complex tasks.
The workspace includes a toolbar, photo processing area, workspace, taskbar, bar graph, navigator, and other functions. The main tools of the program are brushes, a stamp, an eraser, a lasso, a point brush, a healing brush, selectors, cropping, darkening, lightening. They allow you to perform various manipulations with the photo. Mastering the program begins with the study of the workspace and the possibilities of "Photoshop".

A huge variety of tutorials will help beginners learn the basics of image editing. Facial retouching is one of the main techniques of the amateur photographer. If you want to achieve excellence in this matter, look through the work of famous retouchers, constantly learn (including from mistakes) and develop.
What is it for?
Facial retouching is an obligatory stage of professional beauty treatment. Glossy magazines, fashion publications, cosmetics catalogs never publish "raw" pictures. Readers see a ready-made, retouched photograph, which has been added a little gloss. Often in editing beauty and fashion photographs, retouchers use the frequency decomposition technique. It allows you to even out the skin without losing quality and texture. In addition, the "plastic" tool is used, general color correction of the image, darkening and lightening of the desired areas, brightness and contrast adjustment is carried out. Retouching allows you to achieve an ideal, harmonious picture, and this is highly valued in commercial activities.

Face retouching rules
Professional face retouching in Photoshop is a painstaking process that requires certain knowledge and skills from the retoucher. A good photograph is difficult to perfect, but easy to ruin. Beginners often make mistakes, creating the effect of "blurring" the face. In this case, the texture of the skin (pores, wrinkles), facial expressions, shadows completely disappear, the face becomes plastic. The professionals give some tips on how not to ruin your photo.
- Work with high-resolution RAW images.
- Rate the photo visually. Decide what defects should be removed, what actions are needed to improve the picture.
- Always create a copy when uploading a photo to the program.
- Make retouching on a new layer.
- The skin should have texture, forget about the plastic faces. This is no longer relevant.
- Do not completely remove the shadows under the eyes, otherwise the face will become flat.
- Don't remove all the wrinkles from your face. The lack of facial expressions does not make the portrait attractive.
- The edges of the lips should have shadows and the contours should be clear.
- The natural color of the pupils in portrait retouching is right.
- Retouching always depends on the particular photograph and the general plan.
- Stick to naturalness in retouching your face.
Remember that perfect retouching on a photo is invisible.

Tools
Face retouching in Photoshop CS6, as in earlier versions, is carried out using the tools located on the side and top panels. The "Selection" group is necessary to quickly move the desired areas. This includes Lasso, Magic Wand, Quick Selection. Crop tools are designed to crop a picture. With the help of the Retouching tools, you remove defects in a photo, adjust the sharpness, blur, saturation, and tone. Also the toolbar includes "Coloring", "Drawing", "Text".

Actions and plugins
Many people may be interested in the question of how to make face retouching quickly and efficiently. To simplify the work of the retoucher, plugins and actions were created. The first are included in the package of the Photoshop program: Gaussian blur, distortion, noise and others. In addition, plugins can be downloaded and installed additionally. They work in automatic mode and do the main work for the retoucher (stylization, retouching, toning). The downside is that photography has more to lose than gain from such quick styling. Actions add drama to the image, tone, stylize, add various effects.

Errors
Retouching a face is a complex process that requires knowledge, a sense of taste and measure from a photographer. Professionals point out the ten most common mistakes in portrait photography.
- Artificial leather. Despite the processing method, the skin should look natural. Skin texture too fine, aggressive or dry, completely artificial, reminiscent of marble - wrong retouch.
- Excessive rendering of volumes using the Dodge and Burn technique (darkening / lightening). Deep detailing of shadows and highlights is relevant for photo art, but not for professional retouching.
- Flat face. The anatomical lack of volume (shadow / light) on the convex or sunken parts of the face - under the lip, eyes, in the cheekbones, above the eyelids makes the face uninteresting. The lack of realism in flat shots makes such a photo pass by.
- Matte leather. Beautiful matte skin looks healthy, but if there are no single highlights, it looks unnatural.
- White proteins. The subject's eyes should have natural shadows. Natural color, glare in the pupils - all this adorns the photo.
- Duplicate items. If a retoucher cleans the skin with a patch or stamp, it should not be repeated on the surface of the face (when a defective piece of skin is covered with a healthy one). All this gives out retouching.
- Plastic. It is necessary to use this tool in retouching, but you should not overdo it. There are no perfectly straight contours on the human face and body.
- Toning. The colors in the photo should be harmonious. You should not use complex filters in automatic mode to add emotion to the frame. Looking to improve colors? Try to do it manually using the settings.
- Dynamic range. Retouching the face does not need excessive styling.
- High contrast. Vignetting, sharpening and noise enhancement add texture to the photo, but add drama and deprive it of naturalness. Think about whether the portrait needs it?
Hello dear readers of the Start-Luck blog. There are many for retouching portraits, but if you want to achieve an amazing effect, then you have no choice, you have to use Photoshop. It will allow you to create such a result that you can even hang it on the wall or use it in a glossy magazine. All friends and acquaintances will envy your photos, and most importantly, no particularly complicated manipulations.
Today I will tell you how to retouch a face in Photoshop professionally. The work is easy, but painstaking. It may take you at least an hour. But the result will exceed all expectations. It was like that with me.

I will not hide, I took one of the first videos on YouTube, tried to repeat it and did not even really hope for a high-quality result, but it turned out to be perfect. You can read the text with step-by-step pictures, or you can go straight to the end of the article and try to do everything exactly as in the video. For beginners, I would recommend the first option, but it's up to you.
So, I'm working on Photoshop CC, but it doesn't differ much from CS 5 or 6. So there shouldn't be any problems or misunderstandings. The program is in Russian, but during the description, many hot keys will be used. I highly recommend writing them out so as not to forget and learn how to use the program faster and more professionally.
Step-by-step instruction
I sincerely wanted to find a woman to test the pen, but there are very few raw photos on the Internet. I had to use a guy. Among them, imperfect skin was more common. So, I open the program, and then the photo, which I will process. First of all, copy the image to a new layer, for this I press Ctrl + J.

Now you need to get rid of serious flaws. There are several tools. The most obvious problems are easiest to mask with a patch. If you don't see it, just hold down the left mouse button on the icon resembling a plaster for a few seconds. A list of additional tools will appear.

Select the imperfect area and drag it to a nearby area of \u200b\u200bskin that is smoother and more regular.

When done with the most serious defects, create a new layer.

Choose the Spot Healing Brush.

Hardness about 50%, angle 160, slightly flattened shape - 85%.

To decrease and increase the diameter of the brush, use the "[" and "]" keys.

I almost forgot. In the settings, be sure to check the box next to "Sample from all layers" to choose the most correct color.
![]()
Get rid of smaller imperfections - acne, blemishes, unnecessary moles. Just click on the wrong points and they change their color. For convenience, use Alt + mouse wheel to zoom in or out, and you can read about working with in the previous publication.

So it's done.

If you remove the eye icon (visibility) from the top layer, you will see how the photo looked before the changes. It's already a little better.

Now we make a duplicate of all layers, for this we hold down Shift + Ctrl + Alt + E.

And create a duplicate for this new layer. Ctrl + J.

Click on the previous layer to highlight it. We remove the visibility of the layer that is above it to see the results of the work. Open the "Filters" tab in the top menu, select "Blur", in the list that opens, click "Gaussian".

Now it is important to make the skin even and smooth. To do this, increase the blur radius. Don't worry if the eyes and face details aren't visible. In the process, everything will change. For now, only pay attention to the skin. It should be as smooth as possible. Everyone will have their own indicators, do not be afraid to experiment. In my case, 7.4 came up.

Go to the top layer (click on it to turn on the highlight), do not forget to return visibility by clicking on the empty icon next to the layer thumbnail. Now open the "Image" section and find "External channel" in the list.

Select layer 3 (the one on which we applied the blur), check the box next to "Invert", the overlay effect - "Add", scale - 2, shift - 1.

Change the blending mode to "Linear Light".

Combine the top two layers into a group. To do this, click on the folder.

Now click on the third layer again, select the lasso tool, check the anti-aliasing box and select a radius. 20 turned out to be a lot, I used 10. What does it do? When you roughly outline an area of \u200b\u200bskin, the program itself smooths the corners, focusing on the color of the area.

Select areas of approximately the same shade: one cheek, the other, forehead. Apply a Gaussian blur filter to each fragment.

You will see for yourself what radius should be. Remember that thanks to the lasso, the changes will only be applied to the selected area, not the whole picture.

This is how the image looked before the operation.

This is after her. As you can see, the face has become smoother.


The layer should be filled with 50% gray, the mode should be soft light. Click ok.

Change the blending mode of this layer to "Soft Light".


There is some serious work ahead. Set these settings for each instrument: Hardness 0, Range - Midtones, Exposure - 2-3%, and a checkmark opposite “Protect Tones”.

Ditto for the dimmer.

Remember this icon - a black and white circle, it will be very useful in the future. She creates a new adjustment layer. You will have to click on it repeatedly.

Now you will need the Black & White effect.

Decrease the red balance to see highlights and dark spots more clearly. Run over them with a darker and brightener to even out the skin tone. Be careful not to work on the adjustment layer, but on the layer below it. Click to highlight it. In my case, layer 4.
Don't be embarrassed, this job takes a very long time. Perhaps at least an hour. The future of the portrait depends on this moment, so give it maximum attention.

This is what the picture looked like before.

Frankly, I was too lazy to poke around for a very long time, it took about 15 minutes to work. This is the result I got.

Now we delete the adjustment mask by sending it to the trash can.

Create a new layer again and then Shift + F5 and add a gray layer with 100 Opacity and Soft Light Blending Mode.

Change the blending mode here to a similar one.

Let's go through the light and dark areas again with the shader and the clarifier. The exhibitor can be placed a little more - 13 percent.

Pay attention to all the shadows and highlights in the picture. You can choose a larger scale of the instrument.

Reduce the opacity of the layer to make the picture more natural

Now you will have to turn to the black and white circle again to create an adjustment layer - levels.

Direct the middle (gray slider) slightly to the right (I have 0.94), and white to the left (235).

Now we need color balance. I want to .

To do this, pull the topmost slider towards blue, and the bottom towards blue.

I open "Tone" - "Shadows" and do the same.

Fear not, the photo will not be so blue. Hold Alt + Del, everything will return as if to its place.

Now select a white brush and paint over the pupils of the portrait. You may have already worked with. Now you are doing just that.

Reduce the opacity of the layer to add a natural look to the picture.

Add another Hue / Saturation adjustment layer.

We make the picture less saturated.

Now "Curves".

Align the colors to your liking.

The face at the moment does not look completely natural, it is too pale. Go to the red channel. And try to revive it a little.

The same can be done with blue and green.

It is also better to make the opacity of this layer a little lower. For a natural look.

Merge all the previous layers into a heap again.

Select the sharpen filter and add contouring to the portrait.

Select effect 50 and radius 1.

Go to the Unsharp Mask filter again, but this time set the effect to 100 and the radius from 1 to 2.

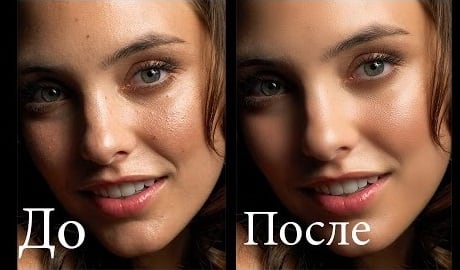
So that is all. This is how our photo looked initially.

And also upon completion of all work.

Video instruction
I believe the text and video modes will help you figure out the finer points and add a great result. If you don't understand something from the text, you can always go to the video and vice versa. I, for example, could not understand at first how to bring all layers into one. But then I figured it out.
Well, if you want to learn how to masterfully, thoroughly, professionally and thoughtfully retouch any photos, I can advise you on the course « Photoshop for the photographer » in it you will find a detailed analysis of each tool and learn how to use them in pursuit of a specific goal and knowing what you are doing and why. You will be able to learn to use the professional program masterfully.

So that is all. Until next time and don't forget to subscribe to the newsletter.
Having taken many photos, we may find that many of them need improvement and subsequent editing, as well as use photo retouching. On some you need to remove the notorious "red eye" effect, on other images - get rid of wrinkles or improve the proportion of the face, on the third - remove excessive redness of the skin and so on. Usually, popular photo editing programs are used for this, like Photoshop or Pixlr, but why not use online photo editors that allow you to carry out the necessary retouching of the picture online with a couple of clicks? In this article I will tell you how to retouch a face photo online, which network tools will help us with this, and how to work with them.
How to edit a face picture correctly
The functionality of these services is quite similar to the specifics of working with stationary photo editing programs, allowing you to easily perform photo retouching online for free without registration. You go to the network resource I specified, upload the desired face photo (usually portrait type) to it, and then go to the photo editing window, where various tabs are located. Switching these tabs, and choosing between the tools available there, you make the necessary changes to the image, then click on the "Save" button, and download the result to your PC.
At the same time, a number of services have an automatic retouching function, when all operations on your photo are performed automatically, and you almost immediately get an improved version of your photo, which you then save to your hard disk.
Instructions for adding a caption to a photo in my past!
Services for face photo retouching
Let's move on to the list of network services that allow you to retouch photos in Russian. I will list several popular free services and explain how to use them.
Makeup.Pho.to - erases pimples, smoothes wrinkles on the face
This service positions itself as an online photo editor with great capabilities from VicMan Software, which, moreover, has released a mobile application Visage Lab with a rather extensive toolkit for photo retouching, similar in functionality.
- To perform face retouching online using this service, go to it http://makeup.pho.to/ru/ and click on the "Start retouching" button.
- Choose where you will import the photo (computer or Facebook) and upload the required photo to the resource.

After uploading the photo, the service will automatically retouch the photo. Options such as skin retouching, wrinkle smoothing, anti-glare, teeth whitening and so on will be automatically applied. After viewing the result, you can remove any of the options by unchecking the corresponding checkbox and clicking on the "Apply" button.

If necessary, you can click on the "Effects" tab on the left, and select any of the effects (Dreamy Retro, Poster Look kg, Phantasy Blue and others).
Retush.net service - whitens teeth, removes red eyes, etc.
Another service that allows you to perform face retouching is Retush.net. This service allows you to work with the built-in English-language photo-editor "Photocat", which has fairly wide possibilities for editing images.
Go to this resource, click on "Upload" and upload the photo you need to the site. On the left are the basic tabs for working with the image: "Edit", "Effects" (effects), "Retouch", "Frames" (frames), "Text" (text), "Local retouch" (local retouch).

By switching between tabs, you can select different tools and apply them to your photo. For example, in the tab "Retouch" you can apply effects to the figure (Figure), skin (Skin), eyes (Eyes), lips (Lip tint). By choosing the width of the coating (Brush size) and the intensity of the effect (Intensity), you can achieve the desired quality of your photo.
To save the result obtained, use the "Save" button on the top right.
Avatan - online photo editor
The next Russian-language service that allows you to edit photos for free is Avatan. To work, log in to this resource, click on the "Start retouching" button, and then "Go to set".
You will enter edit mode. Click on the "Open" button, then on "Open photo", and upload your photo to the resource.
At the top there will be various tabs (filters, effects, textures, and so on), switching between them, and choosing the various tools available in them, you can edit your photo in accordance with your preferences.

To save the result, there is a "Save" button at the top.
IMGonline - photo processing
Service "IMGonline" allows you to perform automatic retouching online using a minimum of settings. Just go to this resource https://www.imgonline.com.ua/retouch-photo.php, click on the "Browse" button and upload the required image to the service.
Decide on other settings (level of retouching, level of general anti-aliasing, sharpness, brightness, contrast), select the output file format (JPEG or PNG-24) and click on "OK".

The photo will be processed, and you can download or view the result by clicking on the corresponding labels on the screen.
Smartbrain - removes skin imperfections in portrait photos
Well, the last service for today is Smartbrain. This service is positioned by the creators as a free online photo editor with an excellent set of different filters for the image.
To work with it, click on "Upload your photo", and then on "Upload file". After loading, you will see at the bottom of the buttons for various options for editing your photo (filters, brightness, contrast, saturation, blur, Tilt Shift, etc.), with which you can make all the necessary changes over the photo.

To save the result, use the "Save" button at the top.
Conclusion
The services I listed make it easy to retouch a photo of a face online. In most cases, they have fairly simple functionality, while some of them have an automatic retouching option, which is useful for those who do not want to burden themselves with unnecessary photo editing efforts. Use the services I have listed - and your photos will look much better, brighter, more representative compared to how they looked before.
There are many ways to retouch skin in Photoshop. Skin often looks unnatural after retouching. We will show you several ways to smooth your face while preserving pore texture.
Step 1 - Removing skin imperfections
Tools and Patch ideal for retouching skin.
Tool Healing Brush works the same asClone stamp (Clone stamp). Healing Brush - allows you to correct skin imperfections taking into account their environment. Like cloning tools, toolHealing Brush Uses specific areas of the image (skin) to copy. But unlike a stamp, the toolHealing Brush takes into account the structure, lighting, shadows of the processed image area (skin).

Patch Tool is a mixtureLasso (Lasso) and instrument Healing Brush... Patch allows you to restore a selection by cloning pixels taken from an adjacent area or sample. LikeHealing Brush, the Patch tool takes into account the structure, lighting and shadows of the processed image area (skin). I.ePatch creates patches on the image. You specify where the patch will be located(Destination - destination) and how are you going to darn it(Source - source).

What tool is for what?
Using Patch you can retouch large areas of the skin such as wrinkles. ViaHealing Brush it is worth retouching small details. If you are processing portraits of private persons, be sure to ask in advance if you need to remove freckles, scars and moles. Small pimples can be removed without asking the customer. In this example, we will show how usingHealing Brush small skin abnormalities can be removed.
Select toolHealing Brush
- Set the source to clone by clickingAlt + left mouse button in the appropriate place on the image
- Swipe the tool over the areas of the image requiring restoration.
So we remove all small pimples and small problem areas on the face.
Step 2 - Skin Color
After processing Healing Brush and Patch, skin may look uneven. Some parts of it may be lighter and others darker. In order for the skin to appear fresher and cleaner, this deficiency must be corrected. In this case, it is important not to touch or disturb the light and shadow pattern.
First, we will enhance the uneven skin effect. The fastest way is to create an adjustment layerVibration (Vibrance) and move both sliders -Vibration (Vibrance) and Saturation to the right to about +100. The value depends on how dark the face you have in the picture. The darker the face, the less you need to move the slider to the right.

Vibration (Vibrance)
Now you can clearly see where the color imbalance is. By the way, the adjustment layerVibration (Vibrance) can be used to identify unnecessary shades in the image.
Create a new layer with 50% gray fill. To do this, go to the menuEditing - Fill (Edit - Fill) and in the drop-down list of the dialog box, select50% gray ... Blending mode -Overlay... This mode works as follows: all pixels whose brightness is more than 50% gray will lighten (for light) and darken (for dark), respectively, light and dark areas, the rest, with brightness below 50%, will become transparent.

Now take a soft brush with 5-15 percent opacity. Set the toolbar to dark gray as foreground color and light gray as background. Use the X key to quickly switch between them.

This is what happens - you see this in normal mode.

Adjustment layerVibration (Vibrance) can be disabled or removed.

Adjustment layerVibration (Vibrance) appeared in Photoshop CS4. If you are working with early versions of Photoshop, you can useChannel Mixer... Check the box hereMonochrome and move the sliders of the red and green channels to the left, and the sliders of the blue channel to the right. So I have the same effect in black and white as the dynamics adjustment layer.

Step 3 - Smooth skin while maintaining pore texture
Option 1 - Blur the skin - the classic way
Filter the simplest (classic) way with which you can get smooth skin.
Merge all visible layers into a new layerCTRL + SHIFT + ALT + D and turn it intosmart object... Advantage smart object is that the degree of blur can be changed at any time.
Now choose from the menuFilter - Blur - Gaussian Blur (Filter \u003d\u003e Blur \u003d\u003e Gaussian Blur).
Choose a radius at which the skin is blurry enough.

Add to smart object black mask (by clicking onALT ) and with a brush of white color (opacity about 50%) paint over the places where we want to see the effect of the filterGaussian Blur... The filter should not affect the face contour, hair, eyes and mouth.

We regulate layer transparency, we set about 40-70%. The pores appeared on the face again.

Option 2 - Blur and sharpen in a single layer
When blurring the skin with the Gaussian Blur filter, some details and small pores are lost. The greater the blur, the greater the loss.
The second popular skin smoothing technique is blur combined with sharpening.
As in the first option, all visible layers are combined into one layer.CTRL + ALT + SHIFT + E.

Choosing a Blending ModeVivid Light and invert the content of the layer with CTRL + I. This blend mode is similar toOverlay with the difference that pixels are not multiplied, but added and not divided, but subtracted.

Important: convert the layer tosmart objectso that you can change the parameters of the blur and sharpen filters at any time.
Choosing a filter Gaussian Blur with a radius of about 3-4 pixels. Click OK.

Then apply the filterHigh Pass (Color Contrast).To do this, go to Filter\u003e Others\u003e High Pass... In the filter choose a radius from 22 to 30 pixels.

Filter High Pass (Color Contrast) often used to sharpen an image.

With a layer mask, you can apply the filter only to the areas where you want to see its effect.

Try changing the blend mode toOverlay. The advantage of this method is that the pores of the skin remain on the face after blurring.
Option 3 - Blur and Sharpenusing Blending Options
As in the first and second options, all visible layers are combined into one layer.CTRL + ALT + SHIFT + E.
Convert the layer tosmart object and apply the blur filterGaussian Blur - Gaussian blur or Surface Blur - Blur on a surface... Then go to Blending Options (To do this, double-click on the layer in the layers window) and select the Gray option in the color zone.

Now you can decide whether you want to show the blurring of the skin and hide the pore texture (for this you need to select the top slider) or to show the pore structure from the bottom layer (for this you need to select the bottom slider).
In this case, we select the blur effect. We moveblack slider right. PressingALT, you can split the slider triangle to create smooth tonal transitions. We do the same with the right (white ) with the slider, moving it to the right.

If you turn off all other layers and leave only this layer on, you will see what happened.

For comparison, blur and sharpening from the second option.

And at the end a little advice. If the pore texture does not show up as you expected, it can be brought out on a separate layer. Go to channels. Select the blue channel STRG + A, copy itSTRG + C and paste into documentSTRG + V.

Then in Blending Options you can remove all light areas, leaving only dark details in the pores. Change the mode of this layer toLuminosity (Brightness).

You can add a layer mask to this layer to hide or reveal the pores in specific areas. This is how this layer looks (all other layers are turned off).

This is what this effect looks like:

Before and after retouching:

Facial retouching implies smoothing out irregularities and natural defects of the skin - removing small pimples, folds, wrinkles. It is also necessary to even out the skin tone and make it more matte. In addition to all these activities, work is carried out with color correction, light and shadow to make the picture more expressive.
In this article, we will take a step-by-step look at how to do face skin retouching in Photoshop in practice.
For example, let's take a photo of the famous model Alessandra Ambrosio.
First step. Matte leather
Open the required image in Photoshop and duplicate the layer.

Create a new layer and change the blending mode to "Blackout".

Take and adjust the Brush tool in accordance with the following parameters, as shown in the screenshot:

We take the radius of the tool so that it is convenient to work with the brush without reaching the borders of adjacent parts of the image, for example, the background, hair, areas without oily sheen. In our case, this is 8 pixels (see screenshot above).
From the original layer, select the most average skin tone possible (the Eyedropper tool or the ALT key on your keyboard).
We paint over shiny areas of the skin. We work on a previously created empty layer. If the result seems too expressive and unnatural, you can turn the "Opacity" slider in the blending options and select the most appropriate values. We put up 70%.

Second phase. Correcting skin flaws
We start correcting pimples and wrinkles by creating a merged duplicate of the layers (Ctrl + Alt + Shift + E). Or another way - select all layers, right-click and in the drop-down menu click on “Duplicate Layers”:

Then select the last three layers, right-click and press “Merge Layers”:

Take the "Healing Brush" with a size value of 7-15 pixels (always individually).

With the ALT key pressed, click on the skin area closest to the defect and "sketch". We repeat this step until all defects are removed from the visible areas of the skin.
We highlighted the areas in our photo with red that will be painted over.

After painting over the irregularities, we got the following result:

As you can see, everything is clean enough now.
To change the texture of the skin, rename our layer and give it a memorable name, for example "Skin covering"so as not to lose. Next, create two duplicates of it.

Apply a filter on the top layer Surface Blur.

Using the settings, we achieve an acceptable result. At this point, it is important not to overdo it and not "blur" large objects such as cheekbones, the shape of the nose, eye sockets, and so on. When a satisfactory result has been achieved, click "OK" to confirm the changes.

If after applying the filter you still see defects, you can reapply the filter.
Add a vector mask. Set the color to black on the palette and click on the button "Add vector mask" hold down Alt.

Change the color in the palette to white, take a soft brush and set the opacity and pressure in the region of 25-45%. Using the tool "paint over" the skin defects until the desired result is achieved.


If the result is unsatisfactory, you can repeat the process by creating a copy of all layers (Ctrl + Alt + Shift + E) and repeat all the steps in order.
The previous step, along with all skin imperfections, removed its natural texture. The skin looks "washed out". To fix this, we will use a previously created layer called "Skin".
First of all, make a merged copy of all layers, then move the "Skin" layer to the very top.

We use a filter on it "Colour contrast" and using the sliders, adjust it so that all parts of the image disappear, except for the smallest details.

We set the value to 1.3 pixels.

Press the key combination on the keyboard Ctrl + Shift + U, which will discolor the layer, and in paragraph "Blend Mode" choose "Overlapping".

To weaken the effect, use the slider "Opacity".

Stage three. Correcting white balance and chromaticity
After all the actions, color spots will appear on the skin and the overall color will become uneven. Color correction required.
Add a color correction layer "Levels" and move the average value until unnecessary highlights disappear from the image.


Again, make a merged copy of all layers and duplicate it by pressing Ctrl + J on the keyboard. Key combination Ctrl + Shift + U make a copy of the layer colorless, and change the layer blending mode to "Soft color".

Apply the effect to the same layer. "Gaussian blur".


If the brightness of the resulting portrait is unsatisfactory, you can reuse "Levels" on a colorless layer.
Now let's compare the original photo and our version after processing:
BEFORE RETUCHING
AFTER RETURNING

As you can see, retouching a portrait / photo in Photoshop is an easy and fun process. By using all of the techniques in this tutorial, you can make any skin look perfect.